Building Note App with NHost

What is NHost?
Backend-as-a-Service - has been around for quite some time now. You must've heard about Google's Firebase or similar services, which allow you to focus on developing your applications instead of worrying about the infrastructure. Among the small pool of providers, there is a relatively new player in the BaaS space - NHost.
Why NHost?
NHost advertises itself as an open-source alternative to Firebase. Personally, I have been using Firebase for around 3–4 years now. Recently, I attended a session - BuildWith x NHost, a hands-on session by HackThisFall and NHost. Pratim took an awesome session, introducing us all to what NHost is. The session was quite intriguing since personally I enjoy exploring the backend, NHost really caught my interest.
The session started with how Nhost works, what it is and why should we check it out, since it was a hands-on workshop, we decided together to get started with Nhost by building something simple, as Pratim said "A note app is the Hello-World to web development". A note to myself when trying out something new ;)
One of the many things I found interesting about NHost is that it provides a GraphQL endpoint using Hasura to interact with the database it provides.
What is GraphQL?
Some of you may have heard about GraphQL before, and some of you may have not - well it's worth giving a read. GraphQL is a specification, which follows a simple motto, you only get what you request.
To better understand this, let's take an example of a grocery shop. You go there and order an item, say Toothpaste. Now imagine if the shopkeeper gets you toothpaste, and along with it, some items like toothbrush, mouthwash, floss, toothpick, etc., most of which you do not need. This is how a typical REST API works.

Now, in the case of GraphQL, the shopkeeper would only get you the toothpaste, that is, the only thing you need.

Let's get building!
The stack would consist of:
React
WindiCSS
NHost - for authentication and database
The source code for this blog is available at https://github.com/officialpiyush/notes-app
To start, let's create a project on Nhost. Navigate to https://app.nhost.io/ and click on the "New Project" button. Write in any name and select a region, click create, and we're good to go 🚀
There are some core files like the one in providers, it's better to leave it alone, but it's a great start if you want to mess around and break some stuff to understand what's going on under the hood.
Now, let's begin with the coding part.
Authentication
Here is the thing I like about NHost client libraries, they come with some pre-defined hooks and components which help simplify the development process plus improves DX. For example, here we would be using the <SignedIn /> and <SignedOut /> helpers, which would help ease the authentication checking process. Let's start!
In our src/pages/index.tsx file, we import the components from the @nhost/react package.
import { SignedIn, SignedOut } from "@nhost/react";
import SignIn from "../components/SignIn";

export default function HomePage() {
  return (
    <div>
      <SignedIn>
        <div>Welcome!</div>
      </SignedIn>
      <SignedOut>
        <SignIn />
      </SignedOut>
    </div>
  );
}
This is how simple it is to check if a user is signed in or not! Isn't it great?
Now, if you're wondering, what would be the logic to log the user in, that is also very simple.
import { useState } from "react";
import { useSignInEmailPassword } from "@nhost/react";

export default YourFunction() {
  const [email, setEmail] = useState("");
  const [password, setPassword] = useState("");

  const { signInEmailPassword, error } = useSignInEmailPassword();

  const handleSubmit = async () => {
    await signInEmailPassword(email, password);
  };

  return (
    // HTML here
  )
}
PS: HashNode doesn't support JSX/TSX highlighting, so there might be some formatting issues in the code block!
This is how simple it is. Now, to test the authentication, we would need to have a user, so, this is how we create a new user from the dashboard:
Now, for this to work, we need to do one last thing, which is to disable "Required Verified Email" in the settings. This is how you do it:
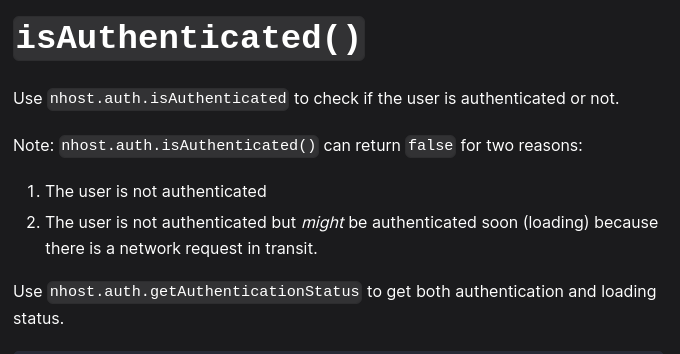
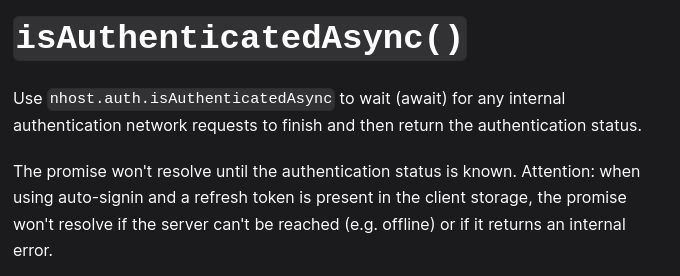
Log-in is done, but what if the user wants to log out now? Well, that is easy too! We just have to call the <nhostClient>.auth.signOut() to sign the user out. Now, to implement this, I created a Navbar, which has a button to sign out. If you want to sign out, you must be signed in, right? To solve the issue of checking whether the user is authenticated or not, the NHost client SDK also provides us with the isAuthenticatedAsync() function. You might ask why the Async function. The SDK happens to provide two functions, isAuthenticated()and isAuthenticaedAsync(). The only difference between them is that the isAuthenticatedAysnc() function will always return the true state of the user authentication status. Here is what the docs say about them
Yay! The authentication process is done!
Database
Now that our authentication part is done, we can now move on to think about how to store the data. For this, NHost provides a PostgreSQL database with 500 MB storage in their free tier. We are going to leverage this for our project.
Let's start by creating a table named notes having fields id, created_at, updated_at, title and user_id. This is how we do it:

It may seem slow because of the low frame rate, but you'll get an idea of how to create the table. This is how the final table must look like: (don't worry about the foreign key thing, there is another screenshot about it below)
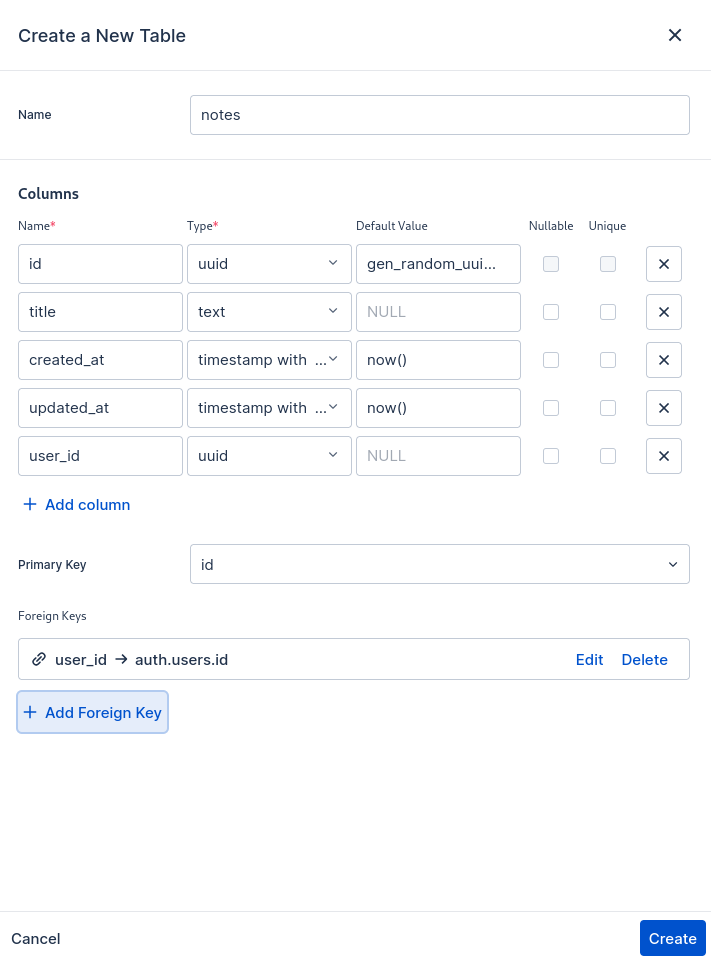
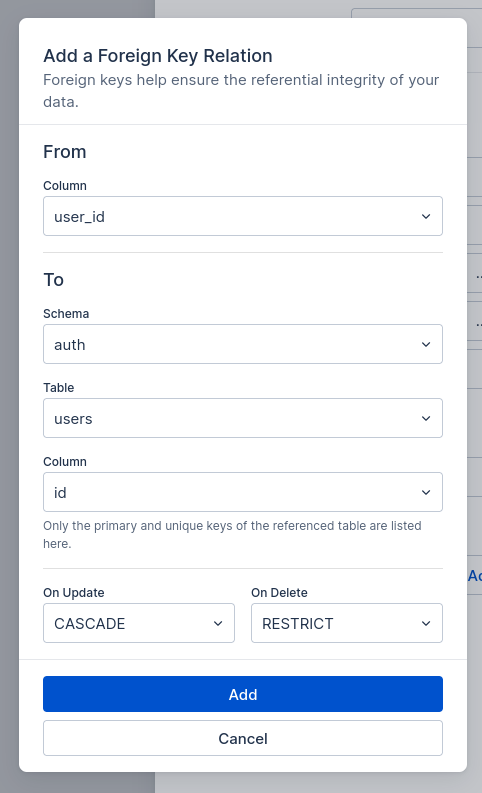
This is how the foreign key section should be, user_id from the notes table references the id column from the users table:
Click Create, and we're done!
Hasura
If you're wondering what Hasura is, it is a tool that helps developers manage GraphQL servers. In short, it creates a GraphQL layer about your traditional database to be able to access it over the GraphQL Endpoint. NHost provides Hasura to connect and transact with our database! Let's get started then \o/

This is how you modify the permissions to allow an authenticated user to create an entry in the database over GraphQL. If the default value for user_id is hard to read in the GIF, here is what it is:

Now that we have the insert data permission set, let's work on the other permissions

And that's it for the permissions side! Let's get back to building our application. Here is a basic GraphQL query for the insert operation:
import { gql } from "urql";

const INSERT_NOTE = gql`
  mutation insertNote($note: notes_insert_input!) {
    insert_notes_one(object: $note) {
      __typename
      title
    }
  }
`;

export default INSERT_NOTE;
Now, for the React part, here is the core logic to interact with NHost:
export default function CreateNote() {
  const [note, setNote] = useState("");
  const [insertError, setInsertError] = useState<CombinedError | null>(null);
  const [{ fetching }, insertNote] = useMutation(INSERT_NOTE);

  const addNote = async () => {
    if (!note) return;
    setInsertError(null);

    const { error } = await insertNote({
      note: {
        title: note,
      },
    });

    if (error) {
      setInsertError(error);
    } else {
      setNote("");
    }
  };

  return (
    // HTML here
  )
}
That was easy! Now, let's move to the part where we have to fetch the notes!
import { useQuery } from "urql";
import GET_NOTES from "../../utils/graphql/get";

const [{ data, fetching }] = useQuery({
    query: GET_NOTES,
});
This is pretty easy too, now moving to the last part, deleting the note.
import { gql } from "urql";

const DELETE_NOTE = gql`
  mutation deleteNote($id: uuid!) {
    delete_notes_by_pk(id: $id) {
        id
    }
  }
`;

export default DELETE_NOTE;
This is the query mutation, and to delete it, we just call the deleteNote function
export default function NoteCard({ id, title }: NoteCardProps) {
  const [insertError, setInsertError] = useState<CombinedError | null>(null);
  const [{ fetching }, deleteNote] = useMutation(DELETE_NOTE);

  const onDeleteNote = async () => {
    setInsertError(null);

    const { error } = await deleteNote({
      id,
    });

    if (error) {
      setInsertError(error);
    }
  };

  return (
    // HTML here
  )
}
This is how simple it is to create a full-fledged application using NHost. It was fun using NHost for this project, and I think NHost would be my go-to choice in the future!
Again, The complete source code for this blog is available at https://github.com/officialpiyush/notes-app
Building this app with NHost was super quick and easy, hope this almost follow-along blog tinkers you to experiment with NHost too, [happy coding!]